Tuesday, 26 May 2020

Final fantasy 7: How to Defeat Jenova Dreamweaver


Final fantasy 7 is ruling over the heart of both experienced and new players. An abnormal creature of Final fantasy 7 “Jenova Dreamweaver” is a final boss of Shinra Building. Well, it’s true there are numerous monsters available in the game that players will enjoy to kill and keep competitive as well. However, it is one of its kind monster that will only be dead if the player knows the right procedure of defeating it. Square Enix has added various amazing tasks that make the game worth playing. No lack of plot twists and amazing content with great characters are some strong sections. In the final area of Shinra Building players need to rescue Aerith by defeating Jenova Dreamweaver.
Jenova Dreamweaver is not a normal boss, and it came from the outer space. Before reaching to the final location of Shinra Building, Jenova hidden in the building and was an experiment subject of Dr. Hojo. The cells of Jenova are places into numerous soldiers, and they now act independently. These soldiers protect Jenova at any cost. So now, here is the guide to defeating this outer space monster strategically.

How to Defeat Jenova Dreamweaver in Final Fantasy 7
While the battle with Jenova there will be Tifa, Cloud, Red and Aerith but Barret will not part of this battle because he is out of this mission. Before landing Aerith into this battle, it is essential to upgrade because it can be a vital source of victory. The Ray of Judgement ability will be fairly useful against Jenova’s body. Firstly there will be three locations where players can attack, which is two on the tentacles, and one is the centre body. Try to break the tentacles firs, because Jenova will not be able to tolerate it, and your attacks will deal more damage. To do this, your Ray of Judgement ability will be quite useful in this condition. While doing this, cloud and Tifa should be ready for using their special attack. These attacks will over the first phase of Jenova.
In another phase, Jenova will be way more deadly, and its attacks will be more effective. One of its vengeance attacks can kill the player in one shot, so it is better to avoid this attack. In the location pillars available and these are part of the advantage. Best way to be defensive and offensive at the same time is to hide behind the pillars and use the long-range attack against the villain. In this phase, Ray of Judgement ability will support so much, and after doing it, this phase will be over as well. Now focus on destroying every tentacle from use mostly long-range attacks. After doing it, every character will learn something new and helpful.
After defeating Jenova in the game, several things will open as rewards and scene will come out. Final fantasy 7 has done a great job to make this remake version of the game because whoever played the original or first edition they know how iconic this part of the game is. However, developers have added several new things that take the game to all new level of entertainment. Final fantasy 7 is recorded as one of the most iconic games of all time and after playing this edition of the game every player understand why this happens. In terms of combat battles, abilities, characters locations, monsters and all more things is a gem for it.
David Root is an inventive person who has been doing intensive research in particular topics and writing blogs and articles on webroot.com/safe and many other related topics. He is a very knowledgeable person with lots of experience.


Sunday, 10 May 2020

How to Open .tif files in Windows 10 without Reducing Quality


The word Tif stands for tagged Image Format, and it is a sort of file that is used to store graphics of high quality. The tif files are often used to store the digital pictures and are considered as a great medium of storing high-quality images. The primary reason behind it is the ability to be compatible with popular applications such as fax, scanner, and desktop publisher. The files are easy to handle, and the users can easily store their preferred graphics into it. However, the users often face difficulty in open it as it usually decreases the original quality of the pictures. In the following blog, we are going to share various specific methods to open the tif files. Read the below-written workaround thoroughly to avoid any mistake.
Use Window Photo Viewer
The users can easily open the tif files through various applications. The Window Photo Viewer is one of them, and it is only for the users who want to see the saved picture in tif files. Below we have brief out the steps to use it.
1.      The users need to open their device.
2.      After that, the users have to go to the tif files.
3.      Then, they need to select the preferred file from the pop-up list.
4.      Once the users selected the file they want to see; then they need to click on it.
5.      Choose the option of View with Window Photo Viewer from the appeared list.
6.      The selected picture will be opened in its original quality.
Use Adobe Acrobat DC
In case the users are facing difficulty in viewing the tif files through Windows Photo Viewer or any app, then they can convert the format to the data. Thus, it will support with the default image viewer on your device. Adobe Acrobat DC is one of the best image converters, and below, we have mentioned the steps to convert tif files through it.
1.      The users need to type Adobe Acrobat DC into the search tab of their internet browser.
2.      Once they successfully inserted it, then they need to hit the enter button.
3.      The users need to click on the homepage of Adobe.
4.      After that, the users have to find and click on the option of Download.
5.      Once the file gets successfully downloaded, then the users need to find it in their devices.
6.      After it is successfully located, then the users need to double-click on it to start the installation process of it.
7.      Once it is successfully installed, then the users need to open it.
8.      Thereafter, the users need to select the tif files.
9.      Choose the format type.
10.  Hit the Enter button.
11.  The format of the file is converted successfully.
Use Irfanview
Irfanview is one of the most popular photo viewing software in the market right now. It is convenient and efficient in comparison to the other software’s in its segment. The users can obtain it at a minimal price of 12$. Below we have discussed its downloading, installing, and working step by step.
1.      The users need to type Irfanview into the search tab of their internet browser.
2.      Once they successfully inserted it, then they need to hit the enter button.
3.      The users need to click on the homepage of Irfanview.
4.      After that, the users have to find and click on the option of Download.
5.      Once the file gets successfully downloaded, then the users need to find it in their devices.
6.      After it is successfully located, then the users need to double-click on it to start the installation process of it.
7.      Once it is successfully installed, then the users need to launch it.
8.      Thereafter, the users need to select the tif files.
9.      Choose the option of View with Window Photo Viewer from the appeared list.
10.  The selected picture will be opened in its original quality.
Use Gimp
GNU Image Manipulation Program is one of the most popular photo editing tools. The software is used to convert the format of the image. The users can easily convert the format of Tif files to make them supported to their devices. Gimp is available for free on the internet, and below, we have brief out its downloading, installing, and working through instructions.
1.      The users need to type Gimp photo editing software into the search tab of their internet browser.
2.      Once they successfully inserted it, then they need to hit the enter button.
3.      The users need to click on the homepage of Gimp.
4.      After that, the users have to find and click on the option of Download.
5.      Once the file gets successfully downloaded, then the users need to find it in their devices.
6.      After it is successfully located, then the users need to double-click on it to start the installation process of it.
7.      Once it is successfully installed, then the users need to launch it.
8.      Thereafter, the users need to select the tif files.
9.      Pick the format in which they are willing to convert the image.
10.  Hit the Enter button.
11.  The format of the file is converted successfully.


Mandy Gray is an inventive person who has been doing intensive research in particular topics and writing blogs and articles on webroot.com/safe and many other related topics. He is a very knowledgeable person with lots of experience.


Thursday, 30 April 2020

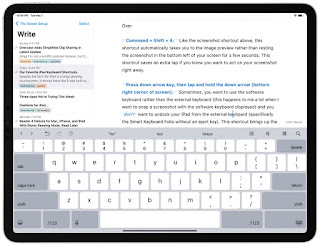
How to view a Hidden “Cheat Sheet” of Keyboard Shortcuts on Your iPad


If you are using a keyboard through your iPad, then you can use easy and quick shortcuts that will display a “cheat sheet” that is available on the keyboard shortcut. When you are using an Apple application or some other third-party application. In this article, we will show you how you can use the keyboard shortcut for your application.
  • First, you need to connect your keyboard with your iPad and then holdCommand for a couple of seconds, and then window will appears on your screen and preview available shortcuts.
  • The appeared listed of keyboard shortcuts to use on your device Home screen, like opening Spotlight search through shortcut key Option +Command + D or Command + Space to view the dock.
  • Invoking a “cheat sheet” of shortcut keyboard using launching with command key is mostly works on every iPad application. There is several third-party applications like twitter that has in-built cheat sheets, but it does not work universally. You need to use this trial and then see the error to view when your favorite application support it.
  • Within Safari, you need to holdcommand to enable three page of shortcuts keyboard to swipe via right or left with a finger. Now you continue holding command thoughswipe among two pages.
  • Here the entire keyboard shortcut may be expected (command + T in case of new tab) appears and you maybe view some that revelation you as Zoom out, Zoom in with Command + and Command + “-.”
  • Here you need to hold Command for a couple of seconds into the file application enable a list of a powerful keyboard shortcut.
  • When the Apple application support Keyboard shortcut, then hold Command for a couple of second to enable the application to shortlist or mostly you can switching among a section of the hoard.
  • There are many keyboard shortcuts you can learn. If you have to feel adventurous and want to try command button for a cheat sheet for your favorite applications. You will be get surprised from the keyboard shortcut that supports Apple, and also developers have bought this touch-centric stage.


Mandy Gray is an inventive person who has been doing intensive research in particular topics and writing blogs and articles on webroot.com/safe and many other related topics. He is a very knowledgeable person with lots of experience


Friday, 24 April 2020

"How to Create a Google Account for Kids via Family Link?


The internet is the best source to gain all types of knowledge, but it can be a treacherous space for children. Nonetheless, there is an abundance of knowledge they can gain online, so we should look for a secure way to let them browse the platform. One such way is ‘Family Link’ app by Google. It is the best way to save our kids and here are the instructions to make a Google account for the kid via Family Link.
Create Google Account via Family Link
  • Go to the App Store or Google Play Store and download the application of Family Link on the parent device.
  • After that, delete whichever existing accounts on the device of the child.
  • You should launch the application of Family Link on the device.
  • Once asked if the child is already using an account of Google, choose the ‘No’ option.
  • Now, input the name of the child and more detail on the following two pages.
  • Once to submit the detail of the kid, make a Google password, and username for the kid.
  • Later, you will be asked to get the device of kid and insert it next to yours.
  • On the device of kid add or log-in with the Google account of kid.
  • Once you get pop-up to access the detail of log-in for the account of the parent.
  • You should confirm through a pop-up or another Google confirmation process that you are trying to log-in to a different device.
  • Then get back to the kid’s device, check and agree on the existing applications you are accepted with them accessing.
  • After some time, the setup procedure is finish.
  • You will view all activity and settings of the kid’s device.
Configure Family Link 
  • First of all, you have to download the application of Family Link on the device of a parent.
  • After that, you should delete any user accounts on the kid’s device.
  • Launch the application of Family Link on the device.
  • Once asked if the child is already using an account of Google, choose the ‘Yes’ option.
  • Then, you will see the Next button, tap on it.
  • After that, download and launch the application of Family Link for kids over the Google Play Store on the kid’s device.
  • You have to insert the code shown on the device inside the application of Family Link for kids on the phone of your kid.
  • When you see a pop-up, input the log-in detail for the account of the parent.
  • Then confirm through a pop-up or another process of Google confirmation that you are trying to log-in to a different device.
  • Get back to the device of the kid, check and agree with the user applications you are accepted with them accessing.
  • After that, the setup procedure is finish.
  • Now, you will view all activity and settings pf the kid’s device.

Mandy Gray is an inventive person who has been doing intensive 
research in particular topics and writing blogs and articles on webroot.com/safe and many other related topics. He is a very knowledgeable person with lots of experience.


Thursday, 23 April 2020

How to Fix Canon Printer Error B203?


Printers are one of the most promising applications that favor offices and household premises. However, due to heavy load on the printers, they often encounter bugs and errors. Nowadays, the printers have been indulged in a new error known as B203. If you are also facing similar issues in your printer, then obtain a resolve through the below-written guidelines.
Execute Power Cycle
In case you intend to execute the power cycle, then you can opt to follow the below-mentioned guidelines.
§  First of all, switch on the Canon printer.
§  After that, detach the power cable through the AC power.
§  You should open it again by pressing the Power key for a while.
§  Then connect the power cable one more time and attach it to the device.
§  Turn on both device and Canon printer.
§  Finally, attempt to take a print and look if the b203 printer error is fixed or not.
Check the Ink Cartridge 
Firstly, switch off the printer and ensure that all the ink cartridges are filled. You should pull all the ink cartridges from the printer and ensure that there is plenty of ink in them. Fill the cartridges again to fix the error. However, the inappropriate installation of ink tanks should also create this printer problem. Therefore, ensure that this is not the case.
Due to Bad Network Connection 
To additionally confirm and solve the issue, take into consideration that a wrong network connection among the printer and PC could probably be the core of it. So, in case you have wirelessly linked with the printer, attempt to connect it again in sort to repair the problem.
Delete Paper Jam
If the users are trying to delete paper jam, then they should carefully apply the given steps.
§  Launch the frontage cover and delete all the torn papers.
§  After that, in case there are whichever obstacles among the paper feed tray and the frontage cover, remove the blue color thumbwheel.
§  Connect the printer again with the power socket and the system.
§  Now, attempt to take a printout and look if the error show again or not.
Upgrade Drivers
§  Hold the Win + R keys at the same time on your system to launch the Run section.
§  After that, input ‘devmgmt.msc’ into it and hit the Enter key.
§  You will see the Device Manager screen will show on the window.
§  Then browse for the Printer Driver and right-click on it.
§  You will get a prompt on the window, so select the ‘Update driver button.’
§  The printer driver will begin upgrading.
§  Now, once upgrading the drivers, reboot the system to apply the modifications.
Though Windows Troubleshooter
Mostly, the reason for the error is the minor internal problems of the printer. Moreover, a few times, the linked PC is all responsible for it. This utility instructions in the Windows 10’s standard troubleshooter help keep the printer free of any errors. You should simply launch it from the search section by inputting troubleshoot into the text field. Thereafter, the handy utility will solve all detected problems automatically.

Mandy Gray is an inventive person who has been doing intensive research in particular topics and writing blogs and articles on webroot.com/safe and many other related topics. He is a very knowledgeable person with lots of experience.